Homemade Keychain Gift for Little Kids to Make
Store-bought gifts from little kids never feel quite right, do they?
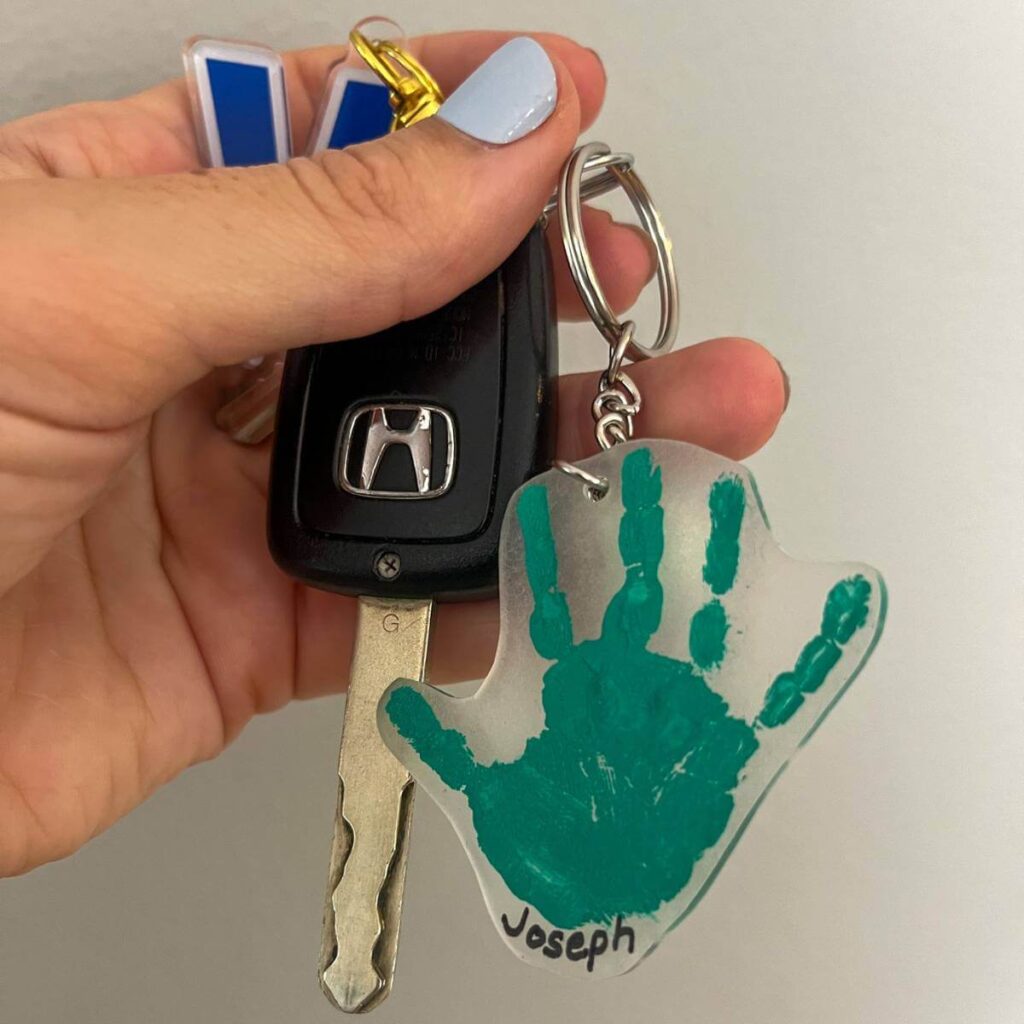
The plastic toys collect dust. The cards get recycled. But a handprint key chain made by tiny hands becomes the thing parents clip to their keys and carry everywhere for years. It is personal, permanent, and a great gift in a way that only a child’s actual handprint can be.
This post may contain affiliate links meaning I make a small commission with no extra cost to you. Read our full disclosure policy here.
Why We Love This Keepsake
This shrinky dink keychain craft takes about 20 minutes from start to finish. Kids press their painted hands or feet onto shrink plastic, you bake it in the oven for a few minutes, and it transforms into a hard, durable keepsake that fits on a keyring. Perfect for Mother’s Day, Father’s Day, teacher gifts, family members or grandparent surprises.
You are about to turn messy paint hands into something parents actually treasure. It’s the perfect gift for parents or adults who don’t really need anything, but appreciate homemade gifts from little ones in their lives.
We prefer homemade gifts kids make
Whenever we’re thinking of gift ideas for parents, grandparents, or teachers, we also love homemade from young children. These gifts have so much more meaning and don’t get thrown away. And it’s an easy way for even babies to be part of holidays.
This simple keychain craft does require adult supervision and a little help from an adult for little kids, but is so worth it for younger children to make their own heartfelt gift.
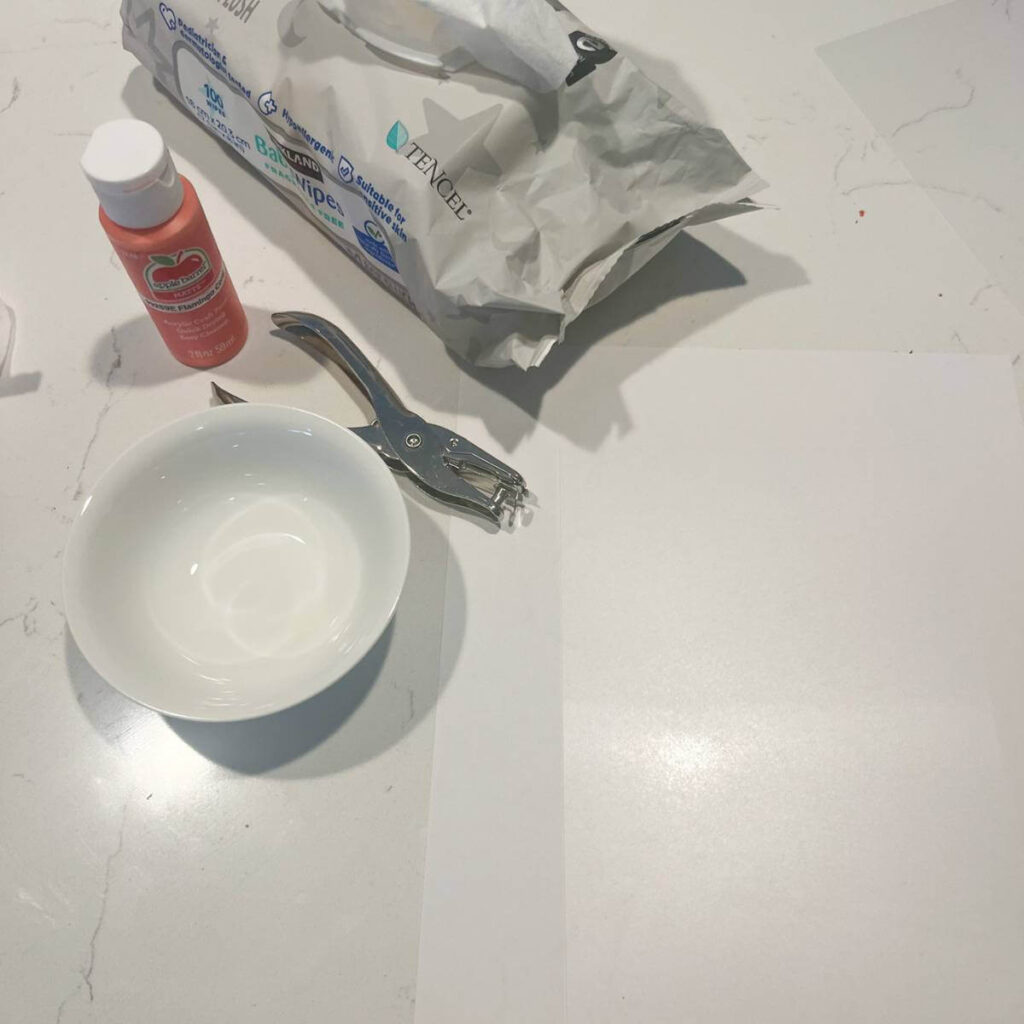
What You Need to Make Handprint Keychains
Before you start, gather everything so the craft flows smoothly and kids stay engaged. Missing one supply mid-project with little ones is a recipe for chaos. But you can easily find these simple materials online or at a local craft store.
Supplies:
- Shrink plastic sheets (also called shrinky dink material or shrink film, available at craft stores or online here)
- Acrylic paint
- Small paint tray or paper plate and paint brush
- Baby wipes or damp cloth (for quick hand cleanup)
- Hole punch (standard size works fine)
- Scissors
- Parchment paper (critical for baking without sticking)
- Baking sheet
- Key rings or lanyard clips
- Permanent Markers
Pro tip: Shrink plastic shrinks to about one-third its original size, so bigger handprints become small keychains. If you are working with toddlers, their tiny hands will shrink even smaller, which actually makes them perfect keychain size. For bigger kids, you might want to use just fingers instead.
Most craft stores carry shrink plastic in the kids’ craft aisle. If you cannot find it locally, search for “printable shrink plastic sheets” online and you will find packs that work great for this DIY keychain.
How to Create the Handprint or Footprint Keychain
This step is where the magic starts, and where things can get messy if you do not set up right. Even simple projects are better when you prep well. And young hands love to wander, so it’s easier if you have it all set up.
1. Paint the Handprint or Footprint
First, put the handprint or footprint on the shrink plastic. Here’s exactly how:
Step-by-step process:
- Cut the shrink plastic into workable pieces. A 4×6 inch rectangle gives you plenty of space for most kid-sized hands or feet. You can always trim it down later.
- Pour a thin layer of acrylic paint onto your tray. You want enough to coat the hand evenly, but not so much that it pools and gets sloppy. One to two tablespoons is usually perfect. Use the paintbrush to smooth out the paint or make sure it’s thick enough.
- Press the child’s hand firmly into the paint. Make sure you get full coverage on the palm and all five fingers. If you miss spots, the print will look incomplete after baking.
- Press the painted hand straight down onto the shrink plastic. Tell kids to push firmly and hold still for three seconds. No wiggling. Wiggling smudges the print and ruins the detail.
- The most important part is that you do everything on the matte or slightly rougher side of the plastic! The paint won’t stay on the shiny side.
- Lift straight up. Do not slide or twist. You want a clean release so the fingerprint lines and palm creases show up clearly.
- Let the paint dry completely before moving to the next step. This takes about 10 to 15 minutes depending on how thick the paint layer is. If you skip this, the paint will smear when you handle it.

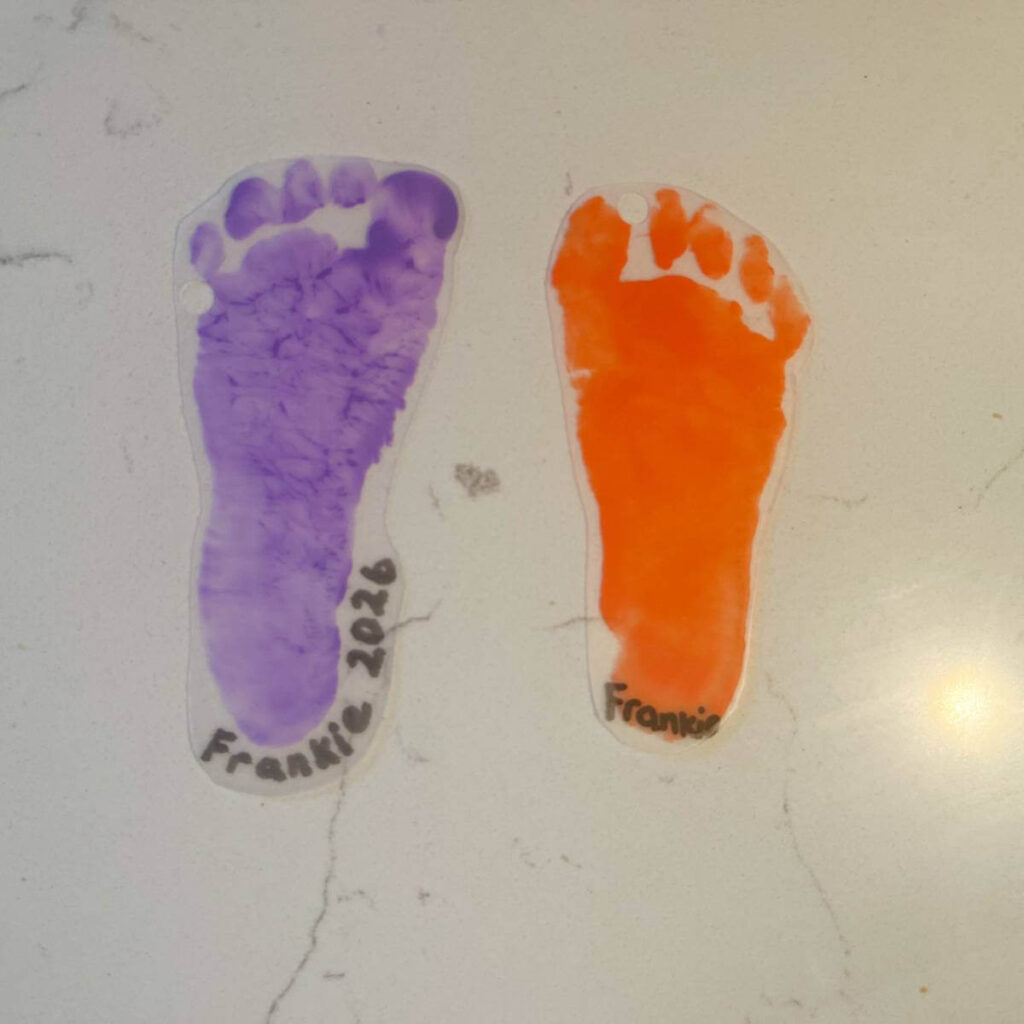
For footprints, the process is identical, but you will need someone to help steady younger kids while they balance on one foot. Footprints tend to show even more detail than handprints because of the arch and toe definition, which makes them extra special for parents and grandparents.
If the first print does not turn out perfectly, do not stress. Just wipe off the plastic with a damp cloth and try again. Shrink plastic is forgiving before it goes in the oven.
2. Punching the Hole and Trimming the Shape
Once the paint is dry, you are ready to prep the keychain for baking.
Punch the hole first, then cut the shape. This order matters because if you cut the shape first and make it too small, you might not have space to punch a hole without it cracking.
Use a standard hole punch and place it about a quarter inch from the edge of the handprint. Anywhere along the top edge works fine. Just make sure you are punching through an area that has solid plastic, not right on the edge of a finger where it might tear later.
Now trim around the handprint. You can cut it into a perfect rectangle, round the corners, or follow the outline of the hand shape. Kids often love cutting around the hand to make it look like an actual hand silhouette.
Here is what most people do not realize: the hole you punch will shrink too. That means a normal hole-punch size becomes much smaller after baking, but a keychain ring still fits. If you’re using a lanyard clip, make two holes next to each other to create one bigger hole.
Add a name or message. Use a fine tip marker to add your child’s name or a message before baking.
3. Baking the Shrink Plastic Keychain
This is the step that transforms a flat piece of painted plastic into a thick, glossy, permanent keepsake.
Preheat your oven to 325 degrees Fahrenheit. Some shrink plastic brands recommend 300, others say 350. If your package has instructions, follow those. Otherwise, 325 is the safe middle ground that works for most brands.
Line your baking sheet with parchment paper. Do not skip this. If you put shrink plastic directly on the metal pan, it will stick and warp in ways you cannot fix.
Place the handprint cutouts on the parchment paper with the painted side facing up. Give each piece a few inches of space. They will curl and twist while baking, and you do not want them touching each other.
Bake for two to three minutes. Stay at the oven and watch through the glass. The plastic will curl, twist, and look like it is ruining itself. This is normal. After about 90 seconds, it will start to flatten back out. Once it lays completely flat and stops moving, it is done.
Remove the baking sheet and let the pieces cool for 30 seconds. They will still be slightly flexible when hot. If one did not flatten perfectly, you have about 10 seconds to press it flat with the back of a spatula while it is still warm.
Once cool, the plastic will be rock hard, about one-third the original size, and the colors will look deeper and shinier. The handprint details will be incredibly crisp. And kids love seeing their colorful creation at this point.
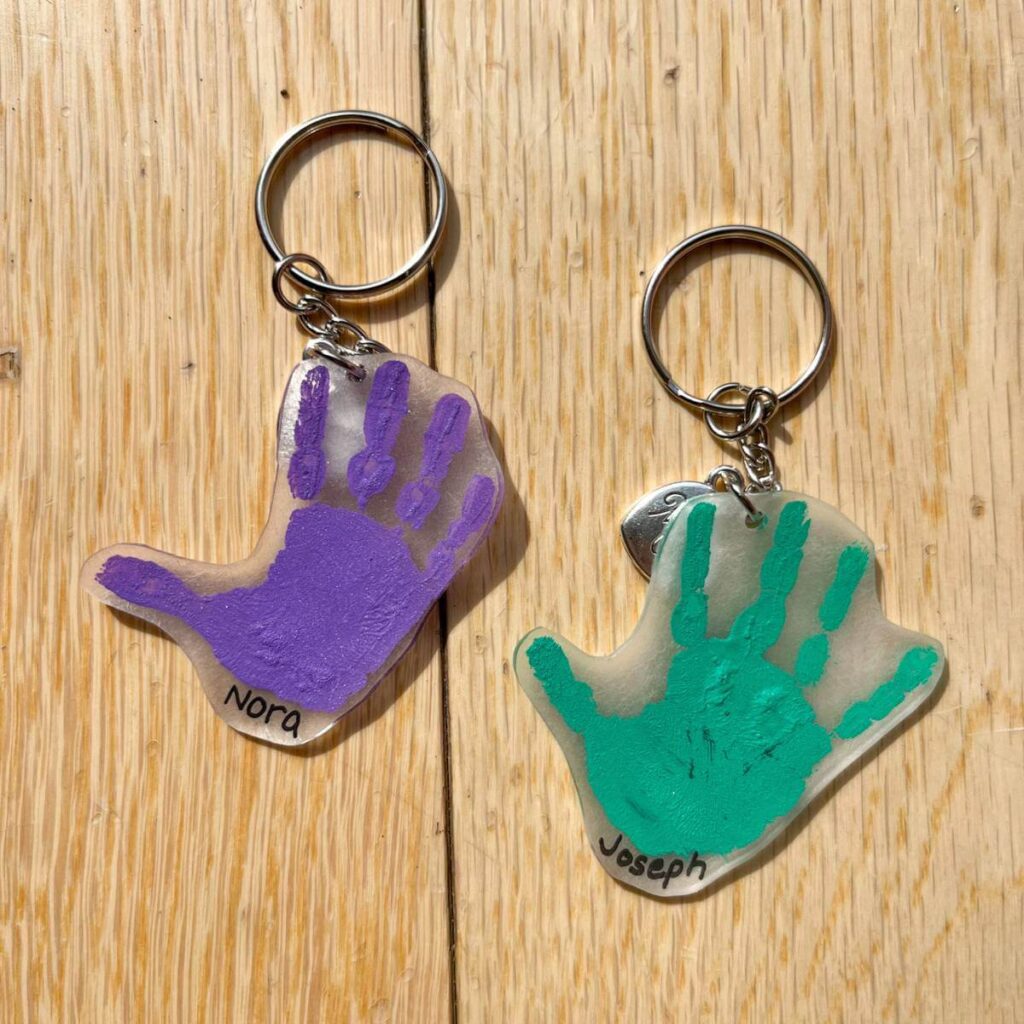
4. Adding the Keyring and Finishing Touches
Your shrunken handprint is now a durable, glossy keepsake, and all that is left is turning it into a keychain someone can actually use.
Thread a keyring or lanyard clip through the hole you punched. Standard split key rings from any hardware store work perfectly. If you want something more decorative, craft stores sell keyring hardware in gold, silver, and colored finishes.
Optional upgrades:
- Add a small tassel or charm to the keyring for extra flair
- Use metallic acrylic paint for a fancier look
- Layer two handprints in different colors and bake them together for a double-sided effect
If you are making this as a gift, consider presenting it in a small gift box or attaching it to a handwritten card that says something like “My hand might be small now, but my love for you is huge.”
Why This Craft Works Perfectly for Mother’s Day and Father’s Day gifts
Most kid-made gifts are cute for about a week, then they fall apart or get tossed.
This one does not. Handprint keychains made from shrink plastic survive years of being clipped to car keys, house keys, and backpack zippers. They ride in pockets, get dropped on concrete, and come out of the washing machine unscathed.
What makes this gift emotionally powerful:
It captures a moment in time. A three-year-old’s hand looks nothing like a ten-year-old’s hand. This keychain freezes that tiny handprint forever, which hits parents and grandparents hard when they realize how fast kids grow. Handprint crafts are a favorite for us because of this.
It gets used every single day. Unlike framed crafts that sit on a shelf, keychains go everywhere. Every time a parent grabs their keys, they see their child’s handprint. That daily reminder is what makes this craft a keeper.
Kids can actually make it themselves. Preschoolers and kindergarteners can do almost every step with minimal help. That independence makes them proud, and parents love knowing their child made something real with their own hands.
It costs less than five dollars to make. A single sheet of shrink plastic makes multiple keychains, and you probably already have paint and scissors at home. Compare that to store-bought personalized gifts that cost 20 to 30 dollars and feel mass-produced.
For Mother’s Day, pair the keychain with a coupon book of things kids can do for mom. For Father’s Day, attach it to a new set of car keys or a grilling tool. And for grandparents, make a set of keychains using all the grandkids’ handprints so they can carry the whole crew with them.
Troubleshooting Common Issues
Even simple crafts hit snags, and this one has a few predictable issues that trip people up the first time.
The paint smudged or did not transfer cleanly. This happens when kids wiggle their hand while pressing, or when the paint layer is too thick. Use less paint next time and remind kids to hold perfectly still for a three-count.
The plastic curled up and did not flatten during baking. You pulled it out too early. Put it back in for another 30 seconds. It will flatten. If it is already cool and still curled, you can reheat it briefly, pull it out while warm, and press it flat with something heavy.
The hole ripped when threading the keyring through. The hole was punched too close to the edge, or it shrunk smaller than expected. Next time, punch the hole farther in, or punch two smaller holes side by side to distribute the pressure.
The colors look faded after baking. Washable paint sometimes loses vibrancy when heated. Switch to regular acrylic craft paint for deeper, richer colors that stay bold after shrinking.
The keychain is too small. Remember, shrink plastic shrinks to about one-third the original size. If you want a bigger finished product, start with a much larger handprint cutout. You can also use just a thumbprint or a couple of fingers instead of the whole hand if you want something more substantial after shrinking.
Craft Ideas for a Whole Class
If you are making these with a group of kids for a class project or party craft, prep all the materials ahead of time and set up a station for painting, a station for drying, and a station for punching and cutting. Assembly-line style keeps things moving and prevents bottlenecks when everyone wants to bake their keychain at once.
This craft is simple enough that most problems fix themselves with a second attempt. Keep extra shrink plastic on hand and let kids try again if their first one does not turn out perfectly. The learning process is part of the fun, and they will be even prouder of the one that worked.
Unique Gift from Kids: Their Own DIY Keychain
Parents will clip these handprint keychains to their keys, their bags, their rearview mirrors. They will carry them for years, long after the paint-stained clothes from craft day get donated. That is the kind of gift that matters, the kind little kids can make with their own two hands and a few minutes in the oven.